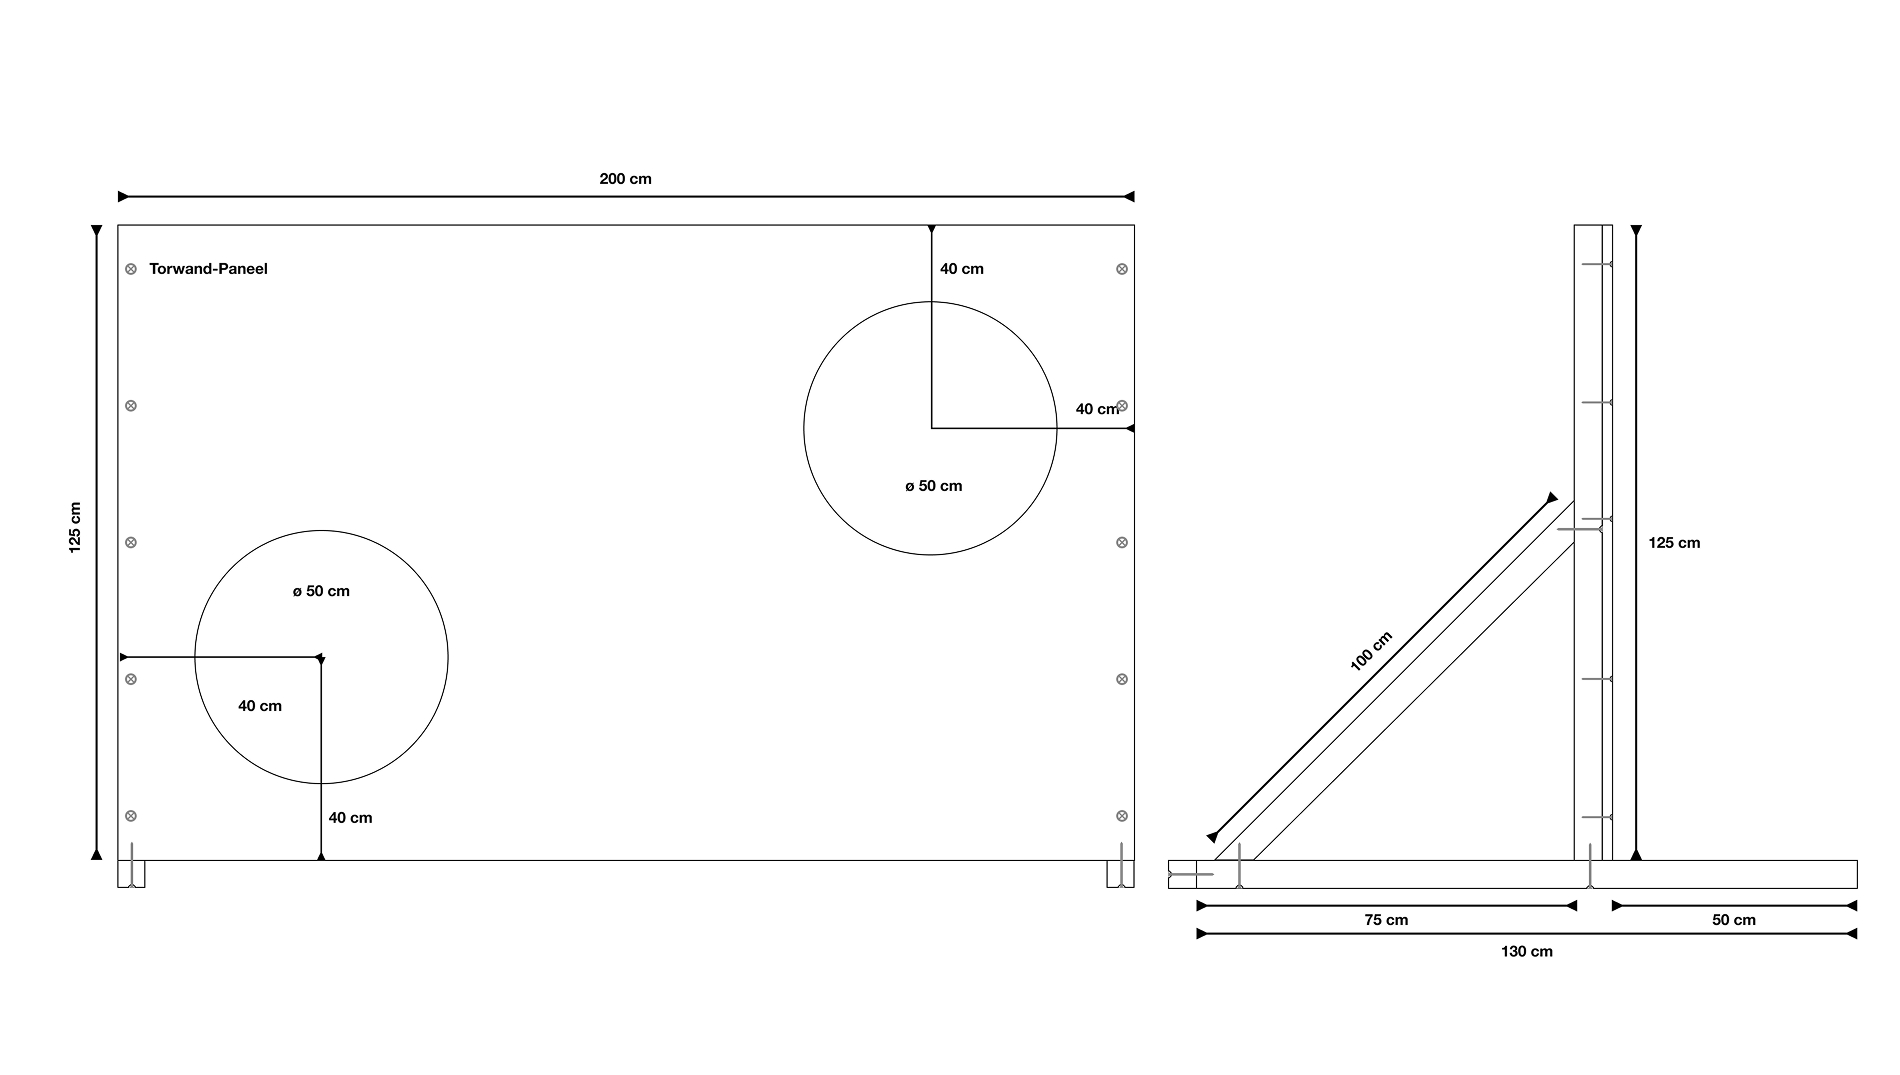
Green wooden goal wall with two goal holes standing in a garden

PARKSIDE Goal Wall

Duration
approx. 10 hours
Difficulty
4/5

30 years of PARKSIDE: A real blast from the past

Anyone who grew up in the 90s knows this feeling: the goal wall, the ball, the perfect shot. This DIY project brings back exactly that nostalgia. Built by hand from wood, it’s a real hit for every PARKSIDER!
Health and safety advice

This project involves the use of a jigsaw and a mitre saw. Please always prioritise your safety and
use the necessary protective equipment

Card Image
1
Prepare the board and mark out the holes
Draw two circles with a diameter of 50 cm and drill pilot holes.
Card Image
2
Saw out the holes and sand the edges
Position the jigsaw over the pilot holes and saw along the circle lines.
Card Image
3
Build 2 x scaffolding stands
Assemble the two uprights that will support your goal frame, one after the other.
Card Image
4
Fit the crossbeams
Erect the two scaffolding posts and connect them with the crossbar.
Card Image
5
Screw on the plywood panel
Check that the board is centred and screw it to each post in at least 4 places.
Card Image
6
Paint the goal wall in PARKSIDE Green
Sand the front and paint it in PARKSIDE Green.
Card Image
7
Golden rings around the bullet holes
For the finishing touch, paint golden rings around the starting holes! Scroll down for the full instructions.

Tools and materials

PARKSIDE tools

More tools

  • Pencil
  • Compass (alternatively a chalk line or template)
  • Sandpaper (P80)
  • Mitre & pull saw
  • Cordless drill driver or impact drill driver
  • Wood drill bit
  • Screws
  • Cordless drill or impact driver
  • Screws (5 x 80 mm)
  • Screws (5 x 50 mm)
  • Sandpaper (240)
  • Paint roller
  • Paintbrush
ComponentsMaterialQuantityDimension in mm
Goal panelMultiplex or screen printing board1 piece200 x 125 x 1,8 cm
Vertical supportSquare timber, min. 54 x 54 mm2 pieces125 cm
Diagonal support (45°)Square timber min. 54 x 54 mm2 pieces100 cm mitred at 45°
Bottom railSquare timber min. 54 x 54 mm2 pieces100 cm
Rear crossbeamSquare timber min. 54 x 54 mm1 piece200 cm
Screws (for the frame)5 x 90 mm, galvanisedapprox. 20 pieces-
Screws (for the goal panel)5 x 50 mm, galvanisedapprox. 10 pieces-
Coloured paintRAL 6005approx. 750 ml-
Coloured paintGoldapprox. 125 ml-
Wood preservative-approx. 750 ml-
SandpaperP120 + P2402 sheets each-
Clamps---
Folding rule---
Pencil---
Diagram of the goal wall with dimensions

Project overview

The frame consists of two identical units that support your goal wall on the left and right.

Each unit consists of:

  • 1 × vertical support (125 cm), supports the goal panel from behind
  • 1 × diagonal support (70 cm, cut at 45°), prevents the structure from tipping forwards
  • 1 × base beam (100 cm), connects the vertical and diagonal supports at the base

The two units are connected by a rear crossbar, which stabilises the goal wall.

If you cannot obtain the goal wall panel or beams in the sizes shown here, simply adjust the lengths accordingly.

Here’s how to proceed

Have all your tools and materials to hand before you get started. Work through the instructions step by step and follow our experts’ tips. That’s how you successfully cut the round to fit the square. Let’s get started!

Step 1

Prepare the board and mark out the holes

Image Alternative Text

Here’s how

Place the plywood panel on a flat surface. Mark the positions of the two holes with a pencil as shown in the diagram. Draw the circle (Ø 50 cm) using a compass, a marking cord or a homemade template. To position the jigsaw, first drill a starting hole inside the circle using the cordless drill.

Tools
Pencil
Compass (alternatively a chalk line or template)
Materials
Goal panel

Step 2

Saw out the holes and sand the edges

Image Alternative Text

Here’s how

Position the jigsaw in the starting hole and saw along the circular line. Work evenly and slowly – this will ensure a cleaner cut. Repeat this for the second hole.


Then sand the edges carefully. First with P120 grit, then with P240. The inner edges of the holes in particular must be smooth – if you hit the ball, it will fly through here. 

Tools
Sandpaper (P80)
Materials
Goal panel

Step 3

Build 2 x scaffolding stands

Image Alternative Text

Here’s how


Now build the two stands that will support your goal wall, one after the other.


For each stand, proceed as follows:


  • Place the base beam, vertical support and diagonal brace together on a flat surface.
  • Position the diagonal brace at a 45° angle between the base beam and the vertical support.
  • Pre-drill at each joint (this prevents the wood from splitting!).
  • Secure with 2–3 screws each (5 × 90 mm, galvanised).


The diagonal braces must be cut at a 45° angle – use a PARKSIDE mitre and rip saw for this, or simply ask at your DIY store’s cutting service.

Tools
Mitre & pull saw
Cordless drill driver or impact drill driver
Wood drill bit
Screws
Materials
Vertical support
Diagonal support (45°)
Bottom rail

Step 4

Fit the crossbeams

Image Alternative Text

Here’s how

Set up the two units. The crossbeam is screwed to the two posts at the back. Pre-drill first, then secure with 2–3 screws per side.

Tools
Cordless drill or impact driver
Wood drill bit
Screws (5 x 80 mm)
Materials
Rear crossbar

Step 5

Screw on the plywood panel

Image Alternative Text

Here’s how

Rest the panel against the front of your scaffolding. Check that the panel is centred.
Now screw it into each post from the front at at least four points. Start at the top and bottom; this will allow you to align the panel slightly before securing the centre points.


Tip: While screwing, ask someone to hold the scaffolding steady from behind – this step is much easier with two people.

Tools
Cordless drill or impact driver
Wood drill bit
Screws (5 x 50 mm)
Materials
Goal panel
Scaffolding

Step 6

Paint the goal wall in PARKSIDE Green

Image Alternative Text

Here’s how

It’s time to add some colour for the PARKSIDE anniversary look!


First, lightly sand the entire front of the goal wall (P240) so that the paint adheres well. Then apply the paint in RAL 6005 – Moss Green – evenly. Apply two coats, allowing each to dry thoroughly in between. Your goal wall now shares the same colour as the tools used to build it.


Next, treat the back of the frame and the cut edges of the holes with wood preservative oil to prevent the wood from swelling. A single coat applied with a brush is sufficient here. The green paint already protects the front.

Tools
Sandpaper (240)
Paint roller
Materials
Coloured paint (RAL 6005)
Wood preservative

Step 7

Golden rings around the bullet holes

Image Alternative Text

Here’s how

Use a brush to add the finishing touch: gold rings around the goal holes – one ring per hole. Your PARKSIDE goal wall is now complete. And now off to the pitch!


Warning: Only set up the goal wall on a level surface. We recommend securing the goal wall against tipping over (e.g. by anchoring it or weighing it down). 
Do not use the goal wall in windy or stormy conditions. Children should only use the goal wall under supervision.

Tools
Paintbrush
Materials
Coloured paint (gold)

Did you like the project?

Please leave a like to show your appreciation for the creator and to recommend the best projects to other users.